You chose a good object for this study, in some aspects simple, but in others quite challenging to photograph. Anything, which is reflective and/or transparent, is going to require quite a bit of thought and preparation. Looking at this submission as a set of thumbnails, you have really explored the glass bowl; looking at angles and height, in addition to and to complement the individual approach to each image. In addition, looking through the other exercises in your blog, you have spent some considerable time exploring the idea of light – natural and artificial – and the way that can impact on any image. Lighting plays such a vital role in the way an image can be captured, and it is no easy thing to control or master.
Shape
The use of a backlight, a black background, and that nicely controlled crescent of light on the ‘ground’ helps to define the shape of this glass bowl. The outline (rim) is well defined, although the glass is quite difficult to light in this way. I particularly like the inconsistency and variation in the light around the rim. As you say in your reflection, the act that the object is transparent means that the entire shape is rendered, rather than just the silhouette, bringing some sense of depth and multi-layered textures to the image.
The second, closer detail shot is very nice, capturing a real sense of the texture and feel of the piece. The use of a longer lens to create a greater depth of field and throw the background into soft focus complements and enhances the object. There is a lovely clarity about the colour and texture here, it looks, exactly I imagine, as the artist hoped, like something fluid and molten captured in time. I think you’re right about the square format, it really helps the composition.
Form
Interestingly, because of the nature of the substance, and the way it has been cast/blown, the use of fill is probably redundant because the light from the key is captured and reflected in the glass. There is a good sense of the form of the object in both images, and while I’m not a great fan of monochrome conversions in digital work, the second image works well in establishing and defining the volume of the object. I might have favoured a slightly higher and oblique angle in the first (colour) image to get a three-dimensional feel of the bowl, but you have managed to capture the curving rim very well here. In the second image, the oblique positioning of the piece helps, although it needs to be either further away from the backdrop, or shot with a longer lens and lower stop to reduce the DOF and eliminate the creases in the cloth.
Texture
The textbooks are right about capturing texture, lights placed at acute angles will capture any roughness or blemishes and produce shadows, but this is tricky with glass because of the smooth surface. The texture in the bowl is mostly inside the material, although with the second image, there is a good sense of the ridges and waves. However, the material is nicely captured here, and there is a good sense of the feel of the object, its smoothness, the flowing surface. The shadows cast by the bowl are worth exploring – I like the pattern cast onto the ground in the second shot, it too, helps to define the nature of the object.
Colour
The use of a black and a white backdrop to explore the colour of the object is a good approach in these two images. The first, from above, is a strong and unusual angle, which makes the (already exotic) piece, look like some strange sea creature captured in shallow water. The colour here is good as the shadow level, and thus contrast is quite low and this renders the greens bright and clear. In the second image, your idea of backdrop and ground in black to crate a floating effect is very good; all elements of the object, shape, form, texture and colour are present here.
So, this is another well-considered and produced assignment, demonstrating both a high level of commitment to exploring lighting technique, and an excellent practical outcome. I think books about lighting techniques have their place, but there is no substitute for exploration and experimentation. But what I do know, is once we understand how to begin to control and manipulate light (and shade), both interior and exterior, then we really begin to understand the nature of photography. Always carry a reflector...
Monday, 30 August 2010
Friday, 27 August 2010
Rain
Brief:
Imagine a magazine cover on one subject: rain. Produce a single, strong, attractive photograph that leaves no one in any doubt about the subject.

Imagine a magazine cover on one subject: rain. Produce a single, strong, attractive photograph that leaves no one in any doubt about the subject.

In order to avoid a really obvious image of falling rain, I thought about the things I normally associate rain with. I came up with dark clouds, puddles, and people with wet clothes or wet hair.
I decided to produce a strong image of dark clouds with an interesting foreground. I've always admired the design of the Lloyd's Building, but have never photographed it. I had to make a few return visits to get this shot as the weather kept changing, but my perseverance eventually paid off.
I took 5 bracketed shots to ensure that I retained detail in the building and captured the gloominess of the clouds. I have tweaked the contrast in the sky to make the clouds appear even more ominous than they actually were.
What have I learned?
This is an example of symbolism with more than one possible meaning. As a magazine cover, with the benefit of a suitable title or caption, the meaning is clear, but by itself it could symbolise many other concepts such as industry or architecture.
Juxtaposition
Brief:
Photograph someone with a possession, or the results of their work or hobby.

This was taken during a demonstration on 5 June. I came across this scene while walking down Whitehall, just outside Downing Street. The protest is in support of the emancipation of Gaza. I thought that the contrast between the noisy protesters and police officers sharing a joke was interesting.
What have I learned?
With hindsight, I should have taken a wider shot with a more shallow depth of field to emphasise the enormity of the demonstration and show greater contrast between impassioned protesters and this light-hearted moment, which was fleeting but significant in my opinion.
Symbols
Brief:
List more than one symbol for the following subjects saying how you might use them in a photograph.
Growth
I might represent this by taking a double exposure, having zoomed in before taking the second shot to show a relative increase in size. Another idea I had was to take a photograph of something small (eg a child) and produce a composite of it next to say a large building, but show the child etc as either equal in size or maybe even larger than the building.
Excess
For this one, I thought about showing someone surrounded by a huge quantity of food. The idea of excess would come across quite strongly if the food consisted of cakes and biscuits or something similar.
My second idea would be a shot taken from one end of a long bar in a pub, of someone at the other end with their head on the bar, surrounded by empty beer bottles.
Crime
I was walking through the East End of London recently, and someone had taped around the outline of the shadow of a street sign on the pavement as a joke. This reminded me of the crime serials from the 1970s, in particular the chalk outlines that used to be drawn around corpses at crime scenes. A photograph of such an outline would be a good representation of crime.
I also thought about getting a shot of police barrier tape, using depth of field to make the tape and background fade progressively.
Silence
I would represent this using a wide shot of a large group of people kneeling in prayer in a church or a mosque. Another way to depict silence is using a Photoshop composite of someone's mouth either zipped or stitched closed.
Poverty
Again, using depth of field, a picture of someone holding a copy of the big issue. Taken with a wide angle lens so that it appears large in the frame, but the arm and features of the person holding it would be blurred.
The other idea I had was to get a shot of some coins in a cap on the pavement, using a slow shutter speed to blur passers by.
What have I learned?
Symbolism is an interesting topic, and not one that I'd really associated with photography until now, but I can see the relevance. One of the problems with symbols is that they can be ambiguous to those who aren't in the know.
The study material raises the point that symbols may be open to interpretation and this is something to consider in modern photography which is conducted more globally nowadays.
Evidence of Action
Brief:
Produce one photograph in which it can be seen something has happened.

I was on my way to photograph a salsa event on Sunday 11 July when I got held up in a queue of traffic. Just as I got out of the car, an air ambulance landed and everyone got their 'phone cameras out and started taking pictures. I went back to my car for my camera and took a few shots with this exercise in mind.
A bystander told me that a young man aged 19 had been stabbed by a gang of youths who had chased him from a bus. A local newspaper later reported that he was airlifted to hospital but, fortunately his injuries were not life threatening.
What have I learned?
The study material suggested taking a photograph including something that has either been broken or emptied. In these examples, it is clear what has happened, but I prefer images which generate questions such as "what has happened?" or "how did that happen?"
A Narrative Picture Essay
This is the final part of my current course (Art of Photography) with the OCA.
Brief:
This project requires you to set yourself an assignment and then photograph it. Tell a story of any kind, in a set of pictures numbering between 5 and 15.


Brief:
This project requires you to set yourself an assignment and then photograph it. Tell a story of any kind, in a set of pictures numbering between 5 and 15.
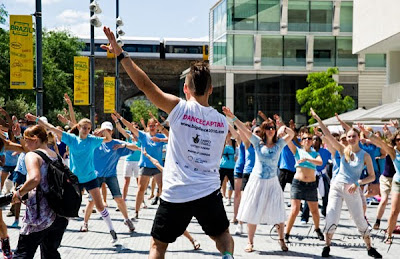
These pictures were taken on 10 July at the T-Mobile Big World Dance 2010 in Central London which was the finale of Big Dance, a biennial event. The Big World Dance was organised so that different parts of London represented the 5 continents, and a dance routine was posted on You Tube for each continent so that participants could learn and practice them in advance. Some of my friends were taking part and I went along to support them and document the day.
The morning began with practise sessions along the Southbank, led by a designated 'dance captain' for each of the continents. This was the West London group who were representing Australasia and was the group that my friends were in:


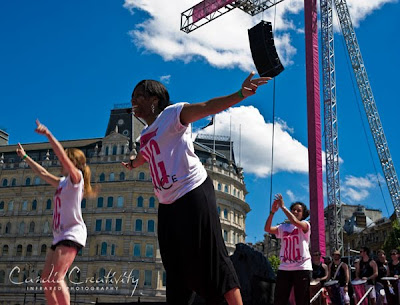
After the rehearsals, we made our way to Trafalgar Square where the choreographer (Luca Silvestrini), musicians and dance captains were introduced:


The dance captains get the crowd fired up and lead the dance groups through their individual routines:


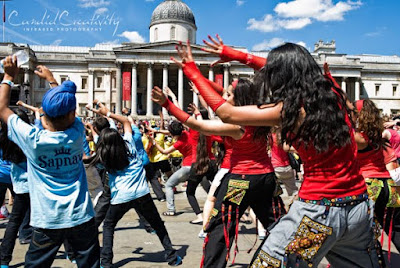
I was lucky enough to be standing in a position where I got a good view of all of the individual groups, but I was closest to the west London section who were representing Europe. There was a group of Asian girls in this group who made a real effort to co-ordinate their outfits and looked really good performing their routine:


All of the groups were then encouraged to mix, and the event ended with a free-for-all:


What have I learned?
This exercise was very similar to the 'Sequence of Composition' images I took (see blog post dated 13 December 2009), so it feels as though I've come full circle.
There is a clear distinction between narrative and illustration but there is some overlap because a picture which forms part of a narrative can also tell a story all by itself.
Thursday, 26 August 2010
Assignment 4 - Lighting Techniques
Brief:
Choose any subject that you can move around and take about eight photographs of it, each in a different kind of lighting. You can use any light at all, from daylight to available artificial light, to photographic lighting.
You should aim to show the following qualities of your subject, one at a time by means of lighting:
The images for this assignment were taken on August 7, 8, 11, yesterday and today. As well as experimenting with different backgrounds, I also wanted to test the light at various times of day, both indoors and outdoors. I also referred to this book:


I was trying to show the characteristics of the dish in this image, ie that it was made from glass and therefore transparent. For that reason, I decided to light it from directly above using a diffused video light. Ordinarily this type of non-directional lighting is not particularly flattering, but it served a useful purpose in this exercise.
Choose any subject that you can move around and take about eight photographs of it, each in a different kind of lighting. You can use any light at all, from daylight to available artificial light, to photographic lighting.
You should aim to show the following qualities of your subject, one at a time by means of lighting:
- Shape - This quality has to do with the outline of an object
- Form - This another way of describing the volume of an object
- Texture - This is quality of the surface detail
- Colour - Choose a kind of lighting and exposure setting that shows the subject's colour as strongly as possible.
The images for this assignment were taken on August 7, 8, 11, yesterday and today. As well as experimenting with different backgrounds, I also wanted to test the light at various times of day, both indoors and outdoors. I also referred to this book:
Though very technical, it helped me to think about lighting set-ups to achieve the desired results. I couldn't really digest all of the contents at this time, so I will definitely revisit it from time to time.
Shape

The subject for this assignment was an ornamental glass dish belonging to my mother. This picture was taken in my kitchen using a black backdrop and velvet 'tablecloth'. The curtains were drawn to eliminate any incidental light.
For this set-up, the camera was on a tripod and a video light, with diffuser was directly behind the object. Due to the thickness of the dish and the relatively small size of the light source, I was able to place the video light very close to it.
A solid object would have resulted in a silhouette with rim lighting, but in this instance the dish has been illuminated, which separates it from the background and (literally) highlights the shape.

This was taken outdoors, holding the dish up to the sky. I tried this shot using all of the white balance settings on my camera and finally settled on this one, which uses the shade setting.
I like the cool green against the warm background - a combination I encountered during the last (colour) assignment. The other white balance settings produced pleasing results, but I felt that those colour combinations were a little overwhelming and detracted from the shape of the dish, which was my primary focus.
I cropped the final image to a square because I think this enhances the curves and diagonals and makes for a more dynamic shot.
Form
I cropped the final image to a square because I think this enhances the curves and diagonals and makes for a more dynamic shot.
Form

My main objective for this category was to show uneven lighting and contrast, which is what I would expect from a three-dimensional object. I have placed the video light on the left (just out of shot) with no fill-light, to make the contrast as stark as possible. I also took this shot with the light on the right, and the results were pretty much the same. The video light was diffused to limit the number of blown highlights.

This was shot indoors using an infrared camera. Light came from a window on the left, diffused by net curtains. I was trying to show the form of the object in an abstract way by eliminating the colour. I tilted the dish by placing it one a roll of sellotape under the velvet 'tablecloth' to change the viewpoint.
Texture

I read that in order to show texture, I would need a small light source at a low angle so that was the set up I used for this image. A video light was placed just out of shot, angled towards the dish. I also used barndoors to restrict the spread of light so that it would be concentrated on the dish.

Colour


I wanted a clean background to accentuate the colour of the object, so I opted for a white 'tablecloth' for this particular set-up. The camera was directly above the dish, on a tripod whilst light was provided by off camera flash from the top left corner. I underexposed by one third of a stop to enhance the colour of the dish, so the background is not as white as it should be but still contrasts with the dish.

Again, I was trying to make the colour of the dish contrast from the background. This time around, I used a video light as the main light source and underexposed. As a result, the backdrop is indistinguishable from the cloth on which the dish was placed, but I think this helps make the dish stand out.
What have I learned?
Some knowledge and understanding of lighting techniques provides a useful starting point, and it's handy to know that certain results may be replicated when required, but there are no hard and fast rules for lighting a subject because there are so many variables involved.
Wednesday, 25 August 2010
Shiny Surfaces
Brief:
Find an object that is so shiny that you can see your face in it. Choose an object that you can lay flat on the floor and photograph from above. Make sure that it is not too large to fit into the viewfinder and choose a simple background.
Set up the object, camera and a light positioned close to the camera. Take a photograph for reference.
Roll some tracing paper in the shape of a cone so that the wide end will sit around the object (but out of view), and so that it tapers upwards towards the small end, which should just surround the lens.
Take a second photograph then experiment with the light in different positions and at different distances. Also try changing the angle of the object slightly.


What have I learned?
Even though I only managed one satisfactory exposure, I understand the principle behind this exercise. The tracing paper cone was effectively a makeshift light tent. Light tents and light cubes are used extensively in product photography for catalogues and websites.
Contrast and Shadow Fill
Brief:
Set up a simple still life shot. Shoot from the same level as the object, with the camera on a tripod. Fix the light at about 2-3 feet to one side of the object and at its level, so that it is aimed at right angles to the camera's view.
Take the first photograph without a diffuser in front of the lamp, and the second with the diffuser. Follow these with five exposures. The light and camera remain unchanged.
Take some white card and place it three feet/one metre away from the object, on the opposite side from the light and facing it. Take a photograph and then move the card twice as close to the object for the next photograph.
Tear off a piece of aluminium foil sufficient to cover the area of the white card and place it against the card, with dull side facing the object for the next exposure. For the next shot, turn the foil around so that the shiny side is facing out.
For the last shot, crumple the foil and then smooth it out again. Place it once more against the card, with the shiny side facing out.
Compare the results and place them in order of contrast, from the one with the biggest difference between the lit and shaded parts, to the least.
Without diffuser

With diffuser

White card at one metre

White card at half a metre

Foil (matt surface)

Foil (shiny surface)

Foil (crumpled)

What have I learned?
The image with the most amount of contrast was taken with undiffused light. Using white card provided fill light and this increased as the card was moved closer to the subject.
A silver surface is more reflective than a white one, so the foil provided more fill light. By crumpling the foil and then smoothing it out, increases the reflective surface area as it is not completely flat, and consequently this produced the greatest amount of fill light.
The Lighting Angle
Brief:
Find a subject with a variety of planes to show differences in shadow and light. Keep the camera in a fixed position aimed horizontally at the subject. Place a plain background some distance behind.
Start with the light, fitted with its diffuser, at the same level as the subject and camera. Between shots, move it around the subject, so that you photograph this lit from the front, from the side, from behind and to one side, and from directly behind.
Then raise the light so that it down towards the subject at an angle of about 45 degrees.Again, move the light around between shots.
Finally, suspend the light overhead, pointing down, and take three pictures: directly overhead, from slightly in front, and from slightly behind.


What have I learned?
When the source of light is directly in front or above the subject, this produces very flat results, lacking in contrast. I prefer directional lighting because it shows the contours better. In this example the light is better when elevated otherwise the hollow opening just becomes a black hole.
Subscribe to:
Posts (Atom)